

Rapid Recovery Protocol
How to train to comeback from injuries

Rapid healing is an underrated superpower.

Rebounding from injuries faster means you can do more hard training sessions which in the long term leads to better results.
So how do you heal rapidly? It starts with enhancing immune function and is supported with passive & active modalities to improve tissue quality.
Enhancing immune function can be a complex topic. Let’s start by working backwards to layout the habits that work against healthy immune function.
Sleep deprivation
Chronic Inflammation
Over Training
Stimulants
Refined Processed Foods (Especially important when considering gut function)
Under eating (low calories for extended periods of time)
Low Micronutrient density (vitamins & minerals)
Alcohol & Drug Use
Dehydration
Stress (physical & emotional, it’s all the same)
That’s a lot of bases to cover but form my experience, people are more than likely bleeding out by a thousand paper cuts. It’s all the little things you shouldn’t be doing that are hurting your health and progress in the gym.

Before thinking about adding MORE to your routine, aim with surgical precision to eradicate all the things from the list above that are holding you back.
Regardless of how well you recover, you will likely still get a bit banged up. All bodies over time will incur mileage if you’re pushing the limits. Keep in mind, the better shape you’re in and the more dialed in your recovery is, the less severe your injuries will likely be and recovering from the should consequently be quicker.
I use the 7 sequential steps outlined below for myself or clients to navigate through injuries and get back to training hard as soon as possible.
This is not medical advice. Do whatever you want.*

1.) Increase Blood Flow Through Pain Free Ranges
The usual strategy tends to be immobilizing and icing the affected area.
Stop icing and immobilizing your injuries and literally do the opposite.

Benefits of Mobilization
Heat production to increase tissue pliability
Increase blood flow & nutrient delivery to help with recovery
Stimulate soft tissue development while reducing stiff scar tissue formation
Build neuromuscular connection within the affected area to reduce pain and rebuild strength
Your body will increase range of motion and decrease pain when it feels safe. We signal safety through movement, especially by adding load, range of motion, or ideally both.

Stick predominantly to body weight only movements at first to avoid potentially overworking the affected tissue. Minimal effective dose, we want to stimulate, not annihilate.
You don’t need a ton of range of motion here, do the range you can tolerate. Move the tissue for 1-3 min through whatever range feels pain free. There’s no rush to increase range of motion for this step, take your time.
Over sets, days, and weeks you’ll be able to further increase your range. The primary purpose of step 1 is to initiate a positive immune response, icing does the opposite, it halts inflammation which is critical and necessary to repair tissues.
2.) Stretch (Static to dynamic)
Static ➡️ Dynamic
Once the tissue has some blood flow it’s time to stretch. Begin with static stretches and hold them for 30 seconds, or better yet, a minute or longer. Holding stretches for less than 30-60 seconds tends to be ineffective.
It’s imperative to begin with static and move into dynamic stretches. You could begin with a 30 second static couch stretch and stretch dynamically by pushing the knee forward and back for another 30 seconds. If this causes too much issues at first, stick with static and work your way up to being able to sink into deeper ranges before adding dynamic stretches.
Static to dynamic is a principle you should use on an immediate and long term time scale. You may be able to start dynamic work after 30 seconds of static stretching on your first day (immediate term) depending on the severity of your injury. Depending on the severity of your injury, It could take days or weeks to begin adding dynamic stretches. Eventually, adding more mobility movements, flows, and higher velocity dynamic stretches is the plan for this section.
Push yourself, but keep pain non-existent to minimal and gradually increase range or velocity of the dynamic stretches.
3.) Work around The Injury Modify Training to Pain Free Ranges
Just because you get a boo boo doesn’t mean you have to stop training.
Just work around it.
Small injuries often are a force for good. You’re likely loading a tissue that isn’t quite ready for the demands you’re placing on it. Getting injured means having to take a step back to increase stability in/around the joints and strengthen supporting muscles, tendons, and ligaments.
Injuries force you to do the things you should’ve been doing all along, and if you’re lucky, they’re minor enough to only take you out of action for a short time rather than the months it would take for a more serious injury like a ligament or muscle tear.
I heavily rely on partials in this section.
In the above video I was performing isometrics against pins since my hips hurt to fully extend (at the time). Deadlifts and squats were out of the question, so I worked in a pain free range that still allowed me to simulate moving a heavy load. Super imporant, soft tissues especially need load to remodel and recover.
Whatever range of motion you can handle pain free should be loaded with light weights and steadily progressed over the course of weeks. People often use injuries as a reason to detrain, and while you may detrain in some aspects, it doesn’t mean you should completely lose your baseline of fitness and strength.
Just work around the injury and perform the same, or as close to the same, of movements as possible just with less load at first.
4.) Hammer Weak and Lagging Muscle Groups
This is probably one of the sections people most frequently screw up.
Since you have a diminished capacity to load a tissue, you need to rely on accessory work to work the affected muscle group. It will likely require substituting in more isolation movements than you otherwise would.
Since you are trying to make up for the lack of load, you need to add volume, and it needs to be effective volume. Some light booty bands for sets of 10 won’t cut it.
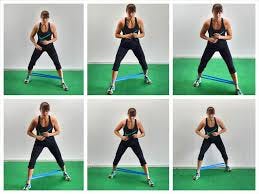
If you’re doing banded work try 5x20, 4x25, 2x50, 1x100. You should be getting a ton of reps with bands if you’re using them. I will personally increase the volume of the isolation work by at least 50%. For example, when my shoulder was bothering me I did 6 sets of tricep work as an accessory instead of 4 sets. If you are doing less heavy compound lifts you can add in more isolation work and still recover from it.
This is also where to include more remedial exercises like trap 3 raises, shoulder External rotations, split squats, and whatever other auxiliary movements would benefit the tissue /joint you’re trying to strengthen.
5.) Introduce Load to Increase Tissue Tolerance (Isometrics to Concentrics)
Isometrics ➡️ Concentrics
Unless the injury is very minor I will not directly load it beyond just the body weight movement in step 1. Eventually, I will begin by adding isometrics and then progressing them to concentrics as strength, stability, and pain all improves.
I would begin with yielding isometrics typically before overcoming isometrics, but both can be used. A wall sit would be an example of a yielding isometric while an isometric squat against pins would be an overcoming isometric. The yielding isometrics can be done for higher volumes and often reduce pain temporarily.
Depending on the severity of the injury Concentrics are also an option. If the injury is minor and you can move a little bit of weight then go for it. I prefer high repetitions with bands to start and then moving into cables, dumbbells, and barbells (in that order).
Machines can also be used supplementally to strengthen affected regions of the body. I always like to begin with higher repetitions (usually 15-25 per set) and assessing the next day. If you wake up the next day in more pain, you probably over did it.
We’re not trying to maximize the training stimulus with the concentric work, we’re just trying to get the tissue accomodated to being loaded again. Start with a small dose (2 to 3 sets) and slowly work the volume up.
6.) Decompress and/or Release the Joint/Tissue
At the end of the session is where I like to add in any decompression and releases. Passive hanging from the bar, distractions, myofascial release, and body tempering can all be used.
Find the best 1 to 3 movements for you but explore with a couple different movements the first week. Whatever you do, make sure to breathe deep and relax through it. Tightening against a foam roller isn’t going to be as effective as melting into it.
7.) Reevaluate and begin to increase load (step #5) on subsequent sessions
Rinse and repeat.
If your body feels good 48 hours after the session, you can begin by either progressing to more dynamic stretches, adding range of motion to stretches/mobility exercises, adding time or variation to your isometrics, or slowly progressing weight on concentrics.
Be patient.
This process takes time because you’re not just trying to bring your body back to where it use to be. If you do this right, you should be more injury resistant and stronger in your weak points than before. Strength isn’t built in a day or a week.
You will likely have to keep some exercises in your routine to prevent backsliding, although the volume of work you’ll need to maintain will be a lot less than the amount of work needed to bounce back from the injury.
Drop a comment if you have any questions or hate mail. None of this is medical advice, go see a doctor or write to your congressman if you’re concerned.
Stay safe and train hard.
Never ever do I want to fall into the piss weak category…
Haha outstanding progression and insights on how to approach them